Thursday, February 28, 2013

Fair enough

Indeed, the sanding is getting old. But it's about over. We faired out the decks yesterday and sanded the bejeezus out of them one more time this morning. Ready for paint as soon as it arrives.


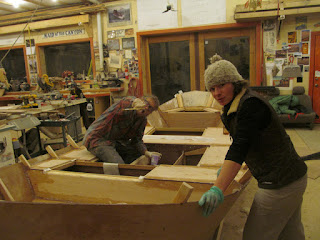
But for a breath of fresh air, we rolled her today, filled all the screw holes, and got after some serious glassing.


Twenty ounces on the exterior walls and another thirty on the chines. The floor will wrap around the chines as well, adding another forty ounces or so to the chines, which in addition to the similar buildup on the inside, gives us some mighty beefy chines. But as we know, our friendly Southwest rivers have some pretty beefy current and some very beefy rocks.


Bottom glassing party Saturday afternoon. You're all invited!

Tuesday, February 26, 2013

Sailor Jerry's revenge

Janek sure picked a heck of a time to joint the project. We've been sanding glass all morning for his first two days. Today was especially sweet for me, having been up until two drinking Sailor Jerry's spiced rum and glassing. After about three hours of sanding I was ready to crawl under the woodpile. But we persevered.


And by about five or six this evening we had the entire decks sanded and glassed. Flow coat went on after dinner.


Forecast for tomorrow is: Fair.

Fillet miñon

Janek showed up this morning to learn the art of annoying sanding and fiberglass work. So in we went, sanding and scraping, chiseling and smoothing, until mid-afternoon. Then we glassed. We started on the fillet joints, which affix the decks to the hull, and raged on until he had to go. 


After a coffee break I launched back into the night shift until Lexi and Derik stopped by about ten pee em. It was a good excuse to quit, so we did a shop tour. After a half a bottle of Sailor Jerry's spiced rum they wanted to know what I had going on the current project and if, perhaps, they could help. Ha! Glove up!


Two hours later we finished the filleting. They had the good sense to flee. I stuck around.


 Does this last shot look like a hobgoblin or a jack-o-lantern to you?


Sunday, February 24, 2013

Storyboards

Here's a quick show 'n' tell on making the weird deck boards. Spiling, scribing, tick-sticking, story-boarding--call it what you wish. It's done by anchoring a board to scribble on (storyboard) in the area where you want your new board. Then take a straight pointed stick, touch it to each important point of the area to be covered by the board, and draw its trajectory and distance on the story board. 


Once you have every impotant point of reference recorded, anchor the storyboard to your new sheet of wood and transfer all the points back off the storyboard.


Connect the dots, cut all the cuts at the proper angles, and it should fit. And it usually does, amazingly well.


This evening I did the majority of the cleaning and smoothing out of the gutters, using a variety of strange, loud tools. There's still a bit of hand work to be done before we glass the decks, but its pretty close.

Saturday, February 23, 2013

Deck the hulls with bowls of folly

After getting the final fifteen thousand little details of the deck framing and bracing done, the hatch interiors and framing are done, painted, oiled, glued, screwed and ready to cover up forever. Now for some more fun: spilling the strange-shaped deck boards and cutting up lots of expensive plywood. 

In the foreground of the first picture is the spilling board for the foredeck. Hard to decipher but it contains all the points needed to make (in theory) a perfect deck.


Ducks in a row, lining up all the points. Then, after double-checking the angles of each cut, I saw out the board and, hoping against hope, take it over to the boat and try to make it fit.


Gobsmacked. This has never happened before. It fit absolutely perfect the first time.


Off and running: a couple more pieces went in, with hatches cut out, before the lateness of the evening made me quit.


But not until a bit of contemplation in the front seat.


Wednesday, February 20, 2013

Post and beam showtime

Lots of chiseling, mortising, rabbeting, and a good deal of swearing these last few days, but the framing is now done, the dreadful guttering is complete, and the Rojo is ready to deck. 


This is that moment when all the ribs are on display, the structure is showing off, an the geometry of the whole thing is dancing before your eyes. From here on, it is cover-up time. Better savor this a bit.


Last thing tonight I sealed up all the gutter joints, put clamps where needed, and let 'er kick.


Monday, February 18, 2013

Self bailer light saber

Scott and Shawn came by today to see their new baby and left me a lovely bottle of tequila from Mexico. As the photos below indicate, it is very good.

I spent the entire day playing in the boatman's footwell, putting in all the framing and walls, and building a self bailer. The tube is made by taping two cardboard wrapping-paper tubes together, then wrapping them in plastic and fiberglassing them. When luck is with you (it was with me today) you can pull out the tubes and plastic as the glass kicks and get a very nice translucent oval tube. I like oval because it takes up less hatch real estate, but still dumps a lot of water fast. It is also kind of fun when the sun is coming from the left side of the boat and you open the hatch and find it all aglow.

The original Briggs self bailers went straight out the bottom of the boat from the stern end of the boatman's footwells, so that the first wave you hit each morning would send an ice-cold whale-spout straight up into your genitals. Not welcome. So we decided to move it to the bow end of the footwell, safely behind the foot brace, and tilt the false floor forward slightly for drainage. This protected the genitals, but, when the boat was parked on a slope in surging beach conditions, it had the effect of pumping the footwell full of sand. So now I run it out the side rather than the floor, and of the boat and the problems seem to be solved.

I put a light in it to help me see where I have it sealed and/or not sealed. It looks especially cool with the shop lights off. Yeah. The tequila is good.


Senses and nonsense

I spent most of today figuring out and building 1) the layout of the side hatch lids, and 2) the obscure guttering for the hatches. 

The first project involved finding the hinge point for the side hatches such that when the lid is open, a boatman could still row; then figuring out how low the inside edge of the hatch should drop in order for the oar, when pushed down on the deck, would parallel the tilt of the hatch lid. Did that make sense? Maybe you had to be there. Anyhow. I think I found the ideal hinge point and hatch angle.

The guttering is a bit more complex to figure out, and even trickier to cut into the framing, as a lot of the channels end mid-board, so they cannot be ripped in on the table saw. So I am using the Dewalt circular saw and a chisel. So far so good. Might throw my mini-router into the mix of tools tomorrow.


I've been meaning to introduce the new shop tool I got last fall. I got mighty sick and tired of trying to get some sort of accurate adjustment out of my flimsy router table and ancient Sears router. So I went ahead and invested in a Grizzly shaper. Wow, what a great tool. Very easy to adjust precisely, a rich whir instead of an ear-splitting scream, and quite affordable. I think the additional money that I will spend on big bits will be more than saved on their strength and longevity. Not to mention saving me from more tantrums. I put a few featherboards on it to keep things running tight and true without having to resort to a big feeder apparatus.


This evening I mixed up a big batch of my latest rendition of boat soup / LTV / oil-stain: A very nice varnish (Pettit Flagship), a good boiled linseed oil, a nice--if expensive--aromatic balsam turpentine, and some really nice kiln-burnt pine tar. The latter two ingredients are from American Rope and Tar, and oh my god do they smell nice. Definitely worth the price if you like that kind of shit. And I got to thinking as I saturated the the understory of the boat, that these boats I so enjoy building should not just perform nicely and look lovely--they should also feel nice to the touch, sound sweet and solid when you thump them, and... they should even smell delicious. Those of us that had the joy of rowing original Briggs dories in Grand Canyon in the '70s and '80s are still brought nearly to tears by the nostalgic smell of the Port Orford Cedar that the boats were framed in and which permeated their hatches. And which I use today not only for its fine woodworking qualities, limberness, and decay resistance, but for its wonderful odor.

The hatches of the Rio Rojo will start out with a distinct odor of turp and pine tar, and as years go by, come to be more dominated by the Port Orford. What fun to think about.

Now... how to make the boat taste good.


Saturday, February 16, 2013

Curvaceous compound cuts

Lots of crazy funky compound curved cuts today. Those boat ends are wild.


As I was delving into the bow boards, Roy and Amy came by. Great to have some extra hands and a little moral support on the bow cuts. Or immoral support. I'm not picky, really.


But greater yet--Amy, of her own volition, while Roy and I were grinding away on the bow braces, went on a tidying rampage and sorted out the five pounds of screws from the strong backs, swept the floors, put away a thousand tools, and generally made life in the shop a whole lot better. Thank you!!!!!


Roof beams

With the bulkheads now all in and plumb (I won), it's time for the main deck beams to go in. 


So I clamped on some temporary gunwales to make sure the four wobbly rib sets that have no bulkheads are in a fair curve with the rest of the boat. Amazingly, this worked. She's got some sweet curves, the Rojo does.


Now that all the rib sets are frozen in place with either a bulkhead or a cross beam, the boat's shape is fully  defined. These beams are made from some wonderful Port Orford Cedar that I got from Allen WIlson up in Gold Beach when I went up there to get the Betty Boop. It was part of the deal--I get the rotten boat and rusty trailer for $200, but I have to buy the $500 worth of clear Port Orford lumber that goes with it. Twist my arm.


Before I finish putting the decks in, it's a nice, easy time to paint and stain the hatch interiors. Tequila Beach rules.

Notice how weird the deck edge cleats look along the top of this picture. Bizarre. They are actually in exactly the proper places, but it looks like they were hurled at random. That wobbly line represents three deck planes intersection a curving hull.


And for the night she will fly, so the floor paint can get warm and dry. Turns out in a wood-heated shop in the winter, floor paint never really gets that warm on its own accord when the boat is sitting down on the floor. I have learned this. Several times now.


Monday, February 11, 2013

Tequila Beach

Some days it seems like things are at a standstill, and other days it seems like the end is coming toward me pretty quickly. Hard sayin.' Today went well--I got the last of the bulkheads finished and, using 37 of my 38 favorite clamps, got all the bulkheads into place just to make sure that the net result would still be a boat. Looking good, actually. Surprisingly good. I could call it gorgeous and not be too far off.


I spent way too much time driving around town taking hours to do ten-minute errands. But back home, finally, I had one great conversation. For years I have been trying to come up with the perfect deck paint color. I want it to be the color of Grand Canyon sand--the color that the boat usually is anyhow, so the boat always looks reasonably tidy even when it isn't. Not to light and bright and glaring, not too dark and hot in the desert sun. Reverse camouflage. I've tried several times to pick the right color, but it always comes out...close... but not quite right. So last fall I collected a vial of sand from the beach below Lava Falls. It is a lovely beach with sand particles from the entire Colorado drainage, and more than a few of my dead brain cells from many years of celebrations. We used to call that camp Lower Lava, but nowadays most folks seem to call it Tequila Beach

I glued the sand to a card today and called the George Kirby Jr. Paint Company in Massachusetts--known and revered among traditional boatbuilders as makers of the best boat paint, made the old way, tough as nails, high in pigment so you don't have to put on a million coats. 


I asked if I sent him a card if he could match the color. He said yes. 

"Actually," I said, "it is a bunch of sand glued to a card, and there are a lot of colors in there, but maybe your color analyzer gizmo can average that out, eh?"

"Well." he said, "our color analyzer is my cousin Bill. He's 55, but his eyes are still pretty good."

I am feeling pretty good about this. And especially good about being able to call the color Tequila Beach.

Back in the shop this evening I got all the bulkheads sanded and ready to glass, then glassed them up. I still have to scamper back down there and give them a flow coat so they can go back in the boat tomorrow. For good.