Sunday, September 11, 2011

The Old San Juan

In June I did a couple San Juan trips for Wild Rivers Expeditions with my dorky dory friends Andy Hutchinson, Kate Thompson, Curtis Patillo, and Jim Hall. Here are a couple shots of the festivities. It is such a beautiful place.


T'boatin' prayer flags


Kiting the boats offshore


The prettiest campsite of my life


Crafts hour


Sunday, June 12, 2011

Edith Survives Lodore

Edith launched on Lodore on May 26 for a four-day run through Lodore and Split Mountain Canyon. The power plant at Flaming Gorge was spinning as fast as it could ast about 4600 cfs. (Although they have since opened the spillways and ramped up to about 8000.) O.A.R.S. Inc was gracious enough to add me as crew (interpreter / storyteller) on a small three-passenger trip. Weather was cold and a bit rainy, but my gourd, it was beautiful up there.


Edith put up a fight in most rapids, not really wanting to pivot when I wanted her to, but in the end, we came through pretty much unscathed. I did rumble a rock in Hell's Half Mile, but there were none of those crunchy crackly sounds and no visible damage. Here's a link to my run in Hell's Half Mile, with my bone-head move toward the end, jarring the camera.

Edith in Hell's Half Mile

After the Yampa boomed in we had about 23,000 cfs--the largest water Edith has seen. Split Mountain Canyon was huge.

I did two dory runs on the San Juan, before and after Edith's Lodore run--fantastic river, great folks, good water, great weather, fun music. I am back home now, about to give Edith a nice rub-down and rest for the summer.

Wednesday, May 4, 2011

Edith Survives Grand Canyon


To my utter astonishment, we made it through upright. She's a wet one, that Edith, and really tough to pivot, but with good ballasting, very stable. I went as an interpreter/storyteller on an Arizona Raft Adventures (AzRA) trip, so in addition to telling stories I got to be one. I'm heading right back out on the river but here are a few videos:

Horn Creek

Granite Falls

Hermit Rapid

Crystal Rapid

Serpentine Rapid

Upset Rapid

Lava Falls

Saturday, April 16, 2011

The View Downstream

Here are the shots looking downstream in those last two rapids.

Big Drop Two: At about 1:10 - 1:15 I am passing the rock that ate our raft.


Big Drop Three. This really shows how freaky and tight this run is.

Friday, April 15, 2011

Edith and Brad in the Big Drops

Here are a couple low-res clips from the Cataract trip. We had those cute little GoPro cameras mounted on the foredeck for the rapids. The videos look way better with the big files on the big screen but this gives you a feeling of what the Edith is like in the big splashy stuff: really wet.

Been Hurt Island 
A short, wet, funky drop, just upstream of Big Drops One, Two, and Three.


Big Drop Two
A fast cut behind a rock, moving from left to right. The big rock I go past toward the end of this shot flipped our raft.


Big Drop Three
This one was a bit puckery. Although both raft folks made it to shore, the raft had a violent, ugly, upside-down run here. It is a blind entry with monstrous holes and pourovers adjacent to the one, oh-so-thin, ever-so-narrow, truly sweet line. Sliding through there made me smile. And spit.


Edith got another coat of Linseed oil-Turpentine-Varnish today in preparation for her Grand Canyon trip in a few days. Although I thought I might have all sorts of re-design and retrofitting to do after the Cataract shake-down, there really wasn't much I wanted to change. We got her right the first time—as right as you can get a Galloway boat.

Edith in Cataract Canyon

Here are three shots by Kate Thompson of Edith and myself in Cataract Canyon last week. (You can see more of Kate's fabulous imagery at www.katepics.com)

Edith is a wet girl, hence my international orange arctic seas anti-exposure suit. It looks so hideously bright in these pictures I have dyed in a lovely shade of monkeypoo brown for next week's Grand Canyon trip.


Sunday, April 10, 2011

Edith in the Wild

We got off the river last night and drove back into a Flagstaff blizzard. Brr—glad to be in a house and off a frigid sandstorming beach. But the trip was great—five days of flatwater down to Cataract Canyon, and a few days in the rapids.

So, one might wonder. What's a Galloway boat like to row?

Wet. Awkward. Slow to turn. But fast, easy to power through the wind, and kind of fun in its own sick, weird, twisted way. The eight-foot oars are both too long and too short at the same time. A bit too long for a 45" oarlock-to-oarlock canoe—it is impossible to get enough leverage inside the oarlock to take a good, mighty stroke; yet the oar is too short to really get the boat moving in the big water. The other thing is that with its long, narrow profile, she draws water from end to end and is near impossible to pivot in the big water. Oh—and the stern, which is the downstream end of the boat, is low enough so that even modest waves crash over it, crash over the splashboard, and land squarely in my face and the oversize cockpit, which quickly swamps. These are problems.

But I've rowed worse. The Powell boat is even tougher in big water, being another five or more feet long and no wider. What I came to realize is that the Galloway style boat is far closer to an Powell boat than I had imagined, far more distant from the Nevills boat that superceded it. Truly a transitional hull, but it is small wonder that the Nevills boat eclipsed it so suddenly and definitively in 1938. I had expected Edith to row somewhat like the Holmstrom boat I built ten years ago, since that was a modified Galloway, being the same lines, but shortened a foot and a half and widened nearly a foot. Not even close. Holmstrom was far further ahead of his time than I had guessed.

But I think with a bit of forethought and a bit of luck, Edith and I will make it through Grand Canyon this month.

Somehow with all the wind and chill, I forgot to take many pictures. I hope to share a few more that others took, along with a clip or two of video. But here are a few shots from Tower Park on the Green River.


Monday, March 28, 2011

Edith gets some adoration

I took my baby girl up to the Guides Training Seminar this weekend—the annual rendezvous of Grand Canyon boatmen. I gave a short talk on the centennial of the Kolb Expedition and the rebirth of Edith. Meanwhile Edith disguised herself as a bookshelf, but fooled no one. Now I have to hose all the drool marks off her. She got a lot of wow and a whole lot of love.


Pack up tomorrow, drive to the Green River Wednesday, launch Thursday. Weather and water are looking good and we are psyched. Woohoo.

I expect there will be no blogposts until I return, so 'til then, happy trails.

Leathering 102

Okay, now it's time to put the stops on. Take some of your one-inch belting (or cut some from your stock). They need to be long enough to go twice around the wrap plus about an inch. Next, taper the last inch of the fuzzy side of each end of the strip down to about nothing, so that as you wrap it around the oar, the second layer doesn't hit a bump where the first layer started, and the overlap ends where the beginning taper ends. Hope that makes sense.

Now tool the leather if you like. Then use masking tape to cover the outer end of the wrap so you don't get epoxy all over your pretty tooled leather. Here are a couple that are ready to go.


Cut some strips of plastic or visqueen or some sort of stretchable plastic just wide enough to cover your stops and about long enough to go one and a half times around the stop. Put a piece of tape on the end to hold it secure once it is on.


Mask your oars above the stop, and your wraps below the stop, leaving about a quarter inch extra exposed so you can wipe the epoxy into a rounded bevel and not leave any tape under the epoxy.


Now mix up a bit of epoxy with thickener—I use Resin Research 2040 with silica and a touch of wood dough for color—about the consistency of mayonnaise. The leather will soak up some of the liquid and make a thicker paste as you apply it. Epoxy the entire inside of the stop and the outside of the wrap.


Now comes the awkward part. Wrap the stop onto the oar, pulling it as tight as you can. Grab one of your visqueen strips and wrap that around the stop, pulling it tight. Once it is pretty tight, grab your roll of masking tape and take a few more tight turns around the stop to make sure it does not come loose.

Now make sure the stop is just where you want it and the second wrap is nicely in line with the first. Using a gloved fingertip, wipe it clean on both edges, leaving a bit of a curve at the junction.

Whew. Intense, eh? Good job. I bet it will take a once through to make sense of this gibberish, but it all makes sense as you do it.

Once the epoxy kicks, take off all the visqueen and masking and trim any sharp edges off with a utility knife. Doesn't that look sweet?


Now heat up a can of paraffin with a torch until it is smoking hot. This one is plenty hot:


Sacrifice a cheap chip brush and paint the first few inches of the wrap (the area where your oarlock will spend nearly all of its time) with a few coats of paraffin until it quits soaking in. As the can of paraffin cools a bit, you can put on one last coat that doesn't really soak in at all but leaves a waxy layer on the wrap.


There's a bit of discretionary latitude on how to treat the rest of the leather and the oar. The treatment I use for oars is a three-part mix of linseed oil, turpentine, and spar varnish. Slobber it on, let it soak in, wipe it off, rub it dry. I use this same system with the remainder of the wrap and the outside tooled surface of the stop. The great thing about this is that you never have to sand down your oars and, if you do it every month or two during the working season, it looks great. Take the same opportunity to re-paraffin the working end of the wraps. Here are some shots of oiling the waxed wraps:


They look a little raw here, but they soon get a magnificent patina. Here's a Kate Thompson shot of the Julius about 2000 miles into the summer of 2002. Note the bronze glow on the wraps:


Note: be sure to use a good waterproof canning paraffin. A friend used paste wax, which is water-soluble, and ended up with soft, sticky wraps every time they got wet. Yuck.

An update: Although I still treat the leathers with molten paraffin initially, for routine maintenance I use the age-old traditional beef tallow, now available in a handy stick form from Swanson Boat Company. They also have leathering kits and set-ups for initial treatment with beeswax and tallow instead of paraffin. 

Wednesday, March 23, 2011

Oar Leathering 101


A lot of folks have asked me about the leather oar wraps I have been running for about a decade. I love them—they outlast P-Tex plastic and, if you wax them before each trip, they are the smoothest wraps going. Them northern guys like rope wraps, but, well, I hate rope wraps. Too sticky-jerky-clunky. I like them really smooth and greasy, effortless to feather even under stress. After a bit of use they take on the metallic bronze sheen of the locks.

The old traditonal method was to tack on the leather with copper tacks, which was pretty easy and self-explanitory. That worked fine on lakes and oceans, where you take consistent, measured strokes. But in whitewater, where you get sudden, violent stresses, oars tend to snap right where you put the darned tacks. Bruce Bergstrom at Smoker Oar explained to me how the tack lets in just the teeniest bit of moisture but it's enough to significantly weaken the oar. And he refused to sell me oars unless I promised not to drive tacks into them. I promised, but then had to come up with a better way. I did, and ten years later all my original wraps are still good as new, and not one broken oar.

 Here's how it works, using Edith's new oars as guinea pigs.

1) Go to the leather store and gitcherself some thick saddle leather. Three-sixteenths to quarter-inch thick is excellent if you can find it. Get some one-inch belting of the same leather for the stops. Buy a good curved sewing needle and some sinew for sewing (or waxed linen) (sinew is more fun to say). Also get a good leather punch. The guy at my leather store, when I told him how many holes I was going to punch, refused to sell me the cheap punch. He made me get the $30 one. That was ten years ago. It rocks.

2) Measure out your wraps (including stops, which will glue on top of your wraps) on your oars, and mark the oars top and bottom. Measure circumference of oars. Cut a leather a bit larger than the diameter to be safe, then trim down to where you have about a quarter-inch gap. (This gap came out a little too big, but it still worked.) Cut the edge closest to the oar blade at a bevel, so it will slide into the oarlock smoothly.


3) If you want to tool the leather, do it now. Wet the leather lightly first.


3) Punch holes every quarter inch up both edges, about a quarter-inch in from the edges.


4) Put two coats of contact cement on the leather and allow to dry.


5) Put a coat on the oar too.


6) Once the glue is dry, soak the leather for a few minutes, until it is soft and wobbly.


7) Now take about five feet of sinew in your curved needle, tie it on to the blade-end of your wrap, get the oar wet, then start stitching with a baseball stitch. (Come up from the bottom of one side, then the other). Be sure you are even with the marks on your oars, because you can't re-do this. IT's gonna STICK.  Pull tight often. Keep the oar and leather wet, so the glue doesn't stick too tightly just yet. It'll stick like all bejeezus once it dries. You should have no trouble stretching the leather around the oar.


8) Tie it off good beneath where your oar stop will go (more on the stop tomorrow). Pound the stitching flat while it is still nice and wet.


Now stand that oar up by the wood stove and do the next three oars. Or have a beer. Or both. Congratulations, You're about half done. Tune in tomorrow for Leathering 102: Oar Stops and Waxing. 

Notice I ran out of tan sinew and used black sinew on the second two. This is also a good angle to see the bevel on the bottom of the wraps.


Monday, March 21, 2011

Moving in

Edith is very happy tonight. She got a full body oiling and massage today, got turned back right-side up, and received her side boxes.

I am swerving a bit from tradition, I confess. The side boxes have plywood in them and have more epoxy joinery than screws. And I am holding them in place with nylon straps and cam buckles. Sacrilege. At least they are brown nylon straps. Worse yet, I'm going to use a Pelican case and a Watershed bag. But they are both brown too.


And here's a romantic shot of a boy and his boat that Jess Pope took a couple nights ago:


Sunday, March 20, 2011

No, really. Back to work.

Damn. Colds can kick a feller's ass. Tonight was the first night since we floated Edith that I've been well enough to realize it's almost midnight in the boatshop. Good to be back on my feet.

Most of the week was I was either laid low, doing computer stuff, or tinkering a bit in the shop. Tonight I built Edith's high-speed keel. Galloway and Stone, in 1909, had removable keels (or skags, or skegs) on their boats to make flatwater rowing easier and faster. The Kolbs followed their recommendation. Here's a shot of them removing the keel as they enter the rapid stretch of the upper Green:

(If you cross your eyes just right you can see this in stereo)

And since Edith's first big trip starts with 120 miles of flatwater, I figured I'd better see what the skags were all about. Making the skeg was easy. Making the embedded hardware to bolt them into took a little longer. I'll finish this silliness tomorrow.


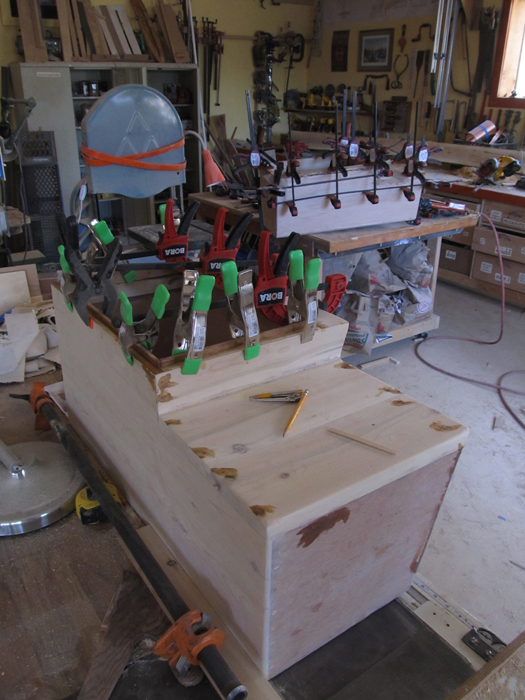
And the sideboxes are about done as well. They took almost all my clamps at once to pull together:


The wind is howling tonight. Might be our last blast of winter. Back to springtime on Wednesday.

Thursday, March 17, 2011

Back to work

Edith and I took a time-out from each other for about three days. She rested in the boathouse while I rested in my house, doing dorky computer stuff and getting my life in order for the next seven months of boating. But this afternoon I went down, rolled her on her side and replaced all the drywall screws I had used on the bottom in lieu of the bronze screws (which arrived yesterday).

Now I am getting ready to outfit the cockpit. My steel library boxes will fit snugly under the seat, adding ballast, displacing water, and supporting the bendy seat board. Three duffle bags fit perfectly behind the seat. And I am beginning to create two large water-resistant side boxes.

I still need to leather the oars and make a way to affix the spares to the boat, but that's really about it.
Here is the view from outside the shop tonight during the bottom-screwing process:


Happy St. Patrick's Day.

Monday, March 14, 2011

A couple more shots

Friends sent in a few more shots of the Edith from yesterday. Thanks Nancy, Bruce, Ena and Steve...
Today was all about wrestling with computers and a cold, and napping. Not nearly as fun as yesterday.
Edith is resting in the shop. She gained fifteen pounds by soaking for a few hours.